
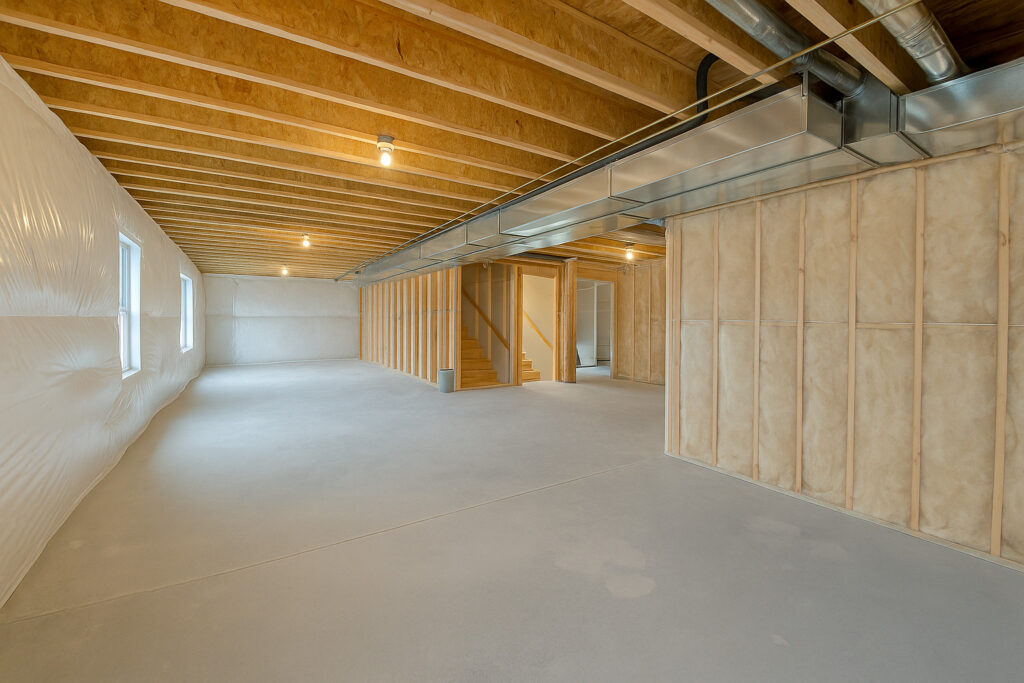
Insulating your basement can transform a chilly, unused area into a comfortable living space while improving your home’s energy efficiency. Many older houses have unfinished, uninsulated basements with bare concrete foundation walls that let heat escape and cold air seep in. By undertaking a DIY basement insulation project, you can significantly reduce heat loss, save on energy bills, and prevent moisture issues that could turn the area into a breeding ground for mold. This guide will walk you through best practices for basement wall insulation, covering multiple methods (from rigid foam panels to fiberglass batts and spray foam) so you can choose the best option for your home.
Why Insulating Your Basement Is Important
Insulating basement walls offers several important benefits for your home:
- Energy Efficiency and Heat Loss Reduction: Uninsulated concrete walls allow a great deal of heat loss through the foundation. In fact, uninsulated basement walls can be responsible for up to one-third of a home’s total heat loss, according to the U.S. Department of Energy. Adding insulation creates a thermal barrier that slows heat transfer, keeping warm air inside in winter and reducing the load on your heating system. Many local building codes now require basement insulation because it saves energy and improves overall efficiency. This upgrade can go a long way toward lowering your home’s energy consumption and utility bills.
- Improved Comfort and Living Space: Insulating your basement makes the space warmer and more comfortable, which is crucial if you plan to use it as a living space (family room, home office, etc.). Warmer basement walls also mean warmer floors in the rooms above. Proper insulation will improve comfort and eliminate that persistent chill often associated with basements. Down the line, if you finish the basement into a basement room, you’ll already have the insulation in place for a cozy, habitable area.
- Moisture Control and Mold Prevention: Basement insulation, when done correctly, helps with moisture management. Cold foundation walls can attract condensation when they meet warm, humid indoor air, leading to dampness and potential mold growth. By adding insulation and sealing gaps (to create an airtight seal), you keep moist warm air away from the cool concrete, reducing the risk of condensation. Insulation materials like closed-cell foam or foam board also serve as a vapor barrier or vapor retarder, preventing water vapor from reaching interior surfaces. This means your basement is less likely to develop moisture issues or become a breeding ground for mold and mildew.
- Increased Home Value and Usable Space: A dry, insulated basement can be turned into functional square footage, adding value to your home. Even if it’s an unfinished basement now, insulating it is the first step toward a future remodeling. It’s a good idea to insulate before finishing the walls, as it’s much harder to do later. Whether your house is large or a smaller home, old or new, proper basement insulation will make it more comfortable and efficient in the long run.
Planning Your Basement Insulation Project
Before you start stapling up insulation or gluing panels to your concrete basement walls, take some time to plan the project. Preparation is key to a successful insulation project. Here are the main factors to consider:
Address Moisture and Repairs First
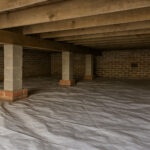
Water issues must be resolved before insulating. The first step is to ensure your basement is dry and free of leaks or seepage. If you have cracks in the foundation or periodic water intrusion, fix those problems (e.g. exterior waterproofing, interior drainage, sealing cracks, etc.) prior to insulating. Insulating over an active leak will trap water and lead to disaster. As one expert puts it, “make sure your basement is dry” before adding interior insulation. Check for any signs of existing mold or rot and remediate those as well. A moisture barrier on the outside of foundation walls or proper grading and gutter downspouts can help keep the basement dry. Taking care of these issues up front will prevent moisture issues from developing behind your new insulation.
Check Building Codes and Climate Requirements
Next, research your local building codes and consider your climate. Building codes often specify minimum R-value (insulation thermal resistance) for basement walls, which can vary by region. For example, the International Residential Code might require around R-5 in warmer zones and up to R-15 in colder zones for basement wall insulation. Local codes may differ, so it’s wise to ask your local building department what’s required in your community. Ensure you also obtain any needed permits if you are doing a significant renovation or finishing the basement.
Climate zone matters because colder climates demand higher insulation levels and have a greater risk of condensation if insulation is inadequate. In climate zone 5 or above (cold climate regions), you’ll typically use more insulation (e.g. 2+ inches of foam or a combination of foam and batts) than you would in zone 3 or 4. Using the right amount and type of insulation for your climate will prevent problems like interior warm air condensing on a cold wall. If you’re unsure, consult resources like the U.S. Department of Energy’s recommendations for basement insulation or ask specific questions to reliable sources such as your local energy office.
Decide on Insulation Type and Method
Several insulation types are available for basements, and the best approach depends on your budget, skill level, and the conditions of your basement. The main options (which we’ll detail in the next sections) are:
- Rigid Foam Board Insulation: Attaching panels of rigid foam (such as XPS or EPS foam boards) directly to the foundation wall is a common and popular choice for insulating basements. Foam boards are moisture-resistant and provide continuous insulation with a relatively high R-value per inch. This method is great for energy efficiency and thermal loss reduction because the foam creates an unbroken insulation layer. It’s often considered one of the best practices by professionals for basement walls. We’ll cover how to install foam panels in large sheets and seal them up in Method 1 below.
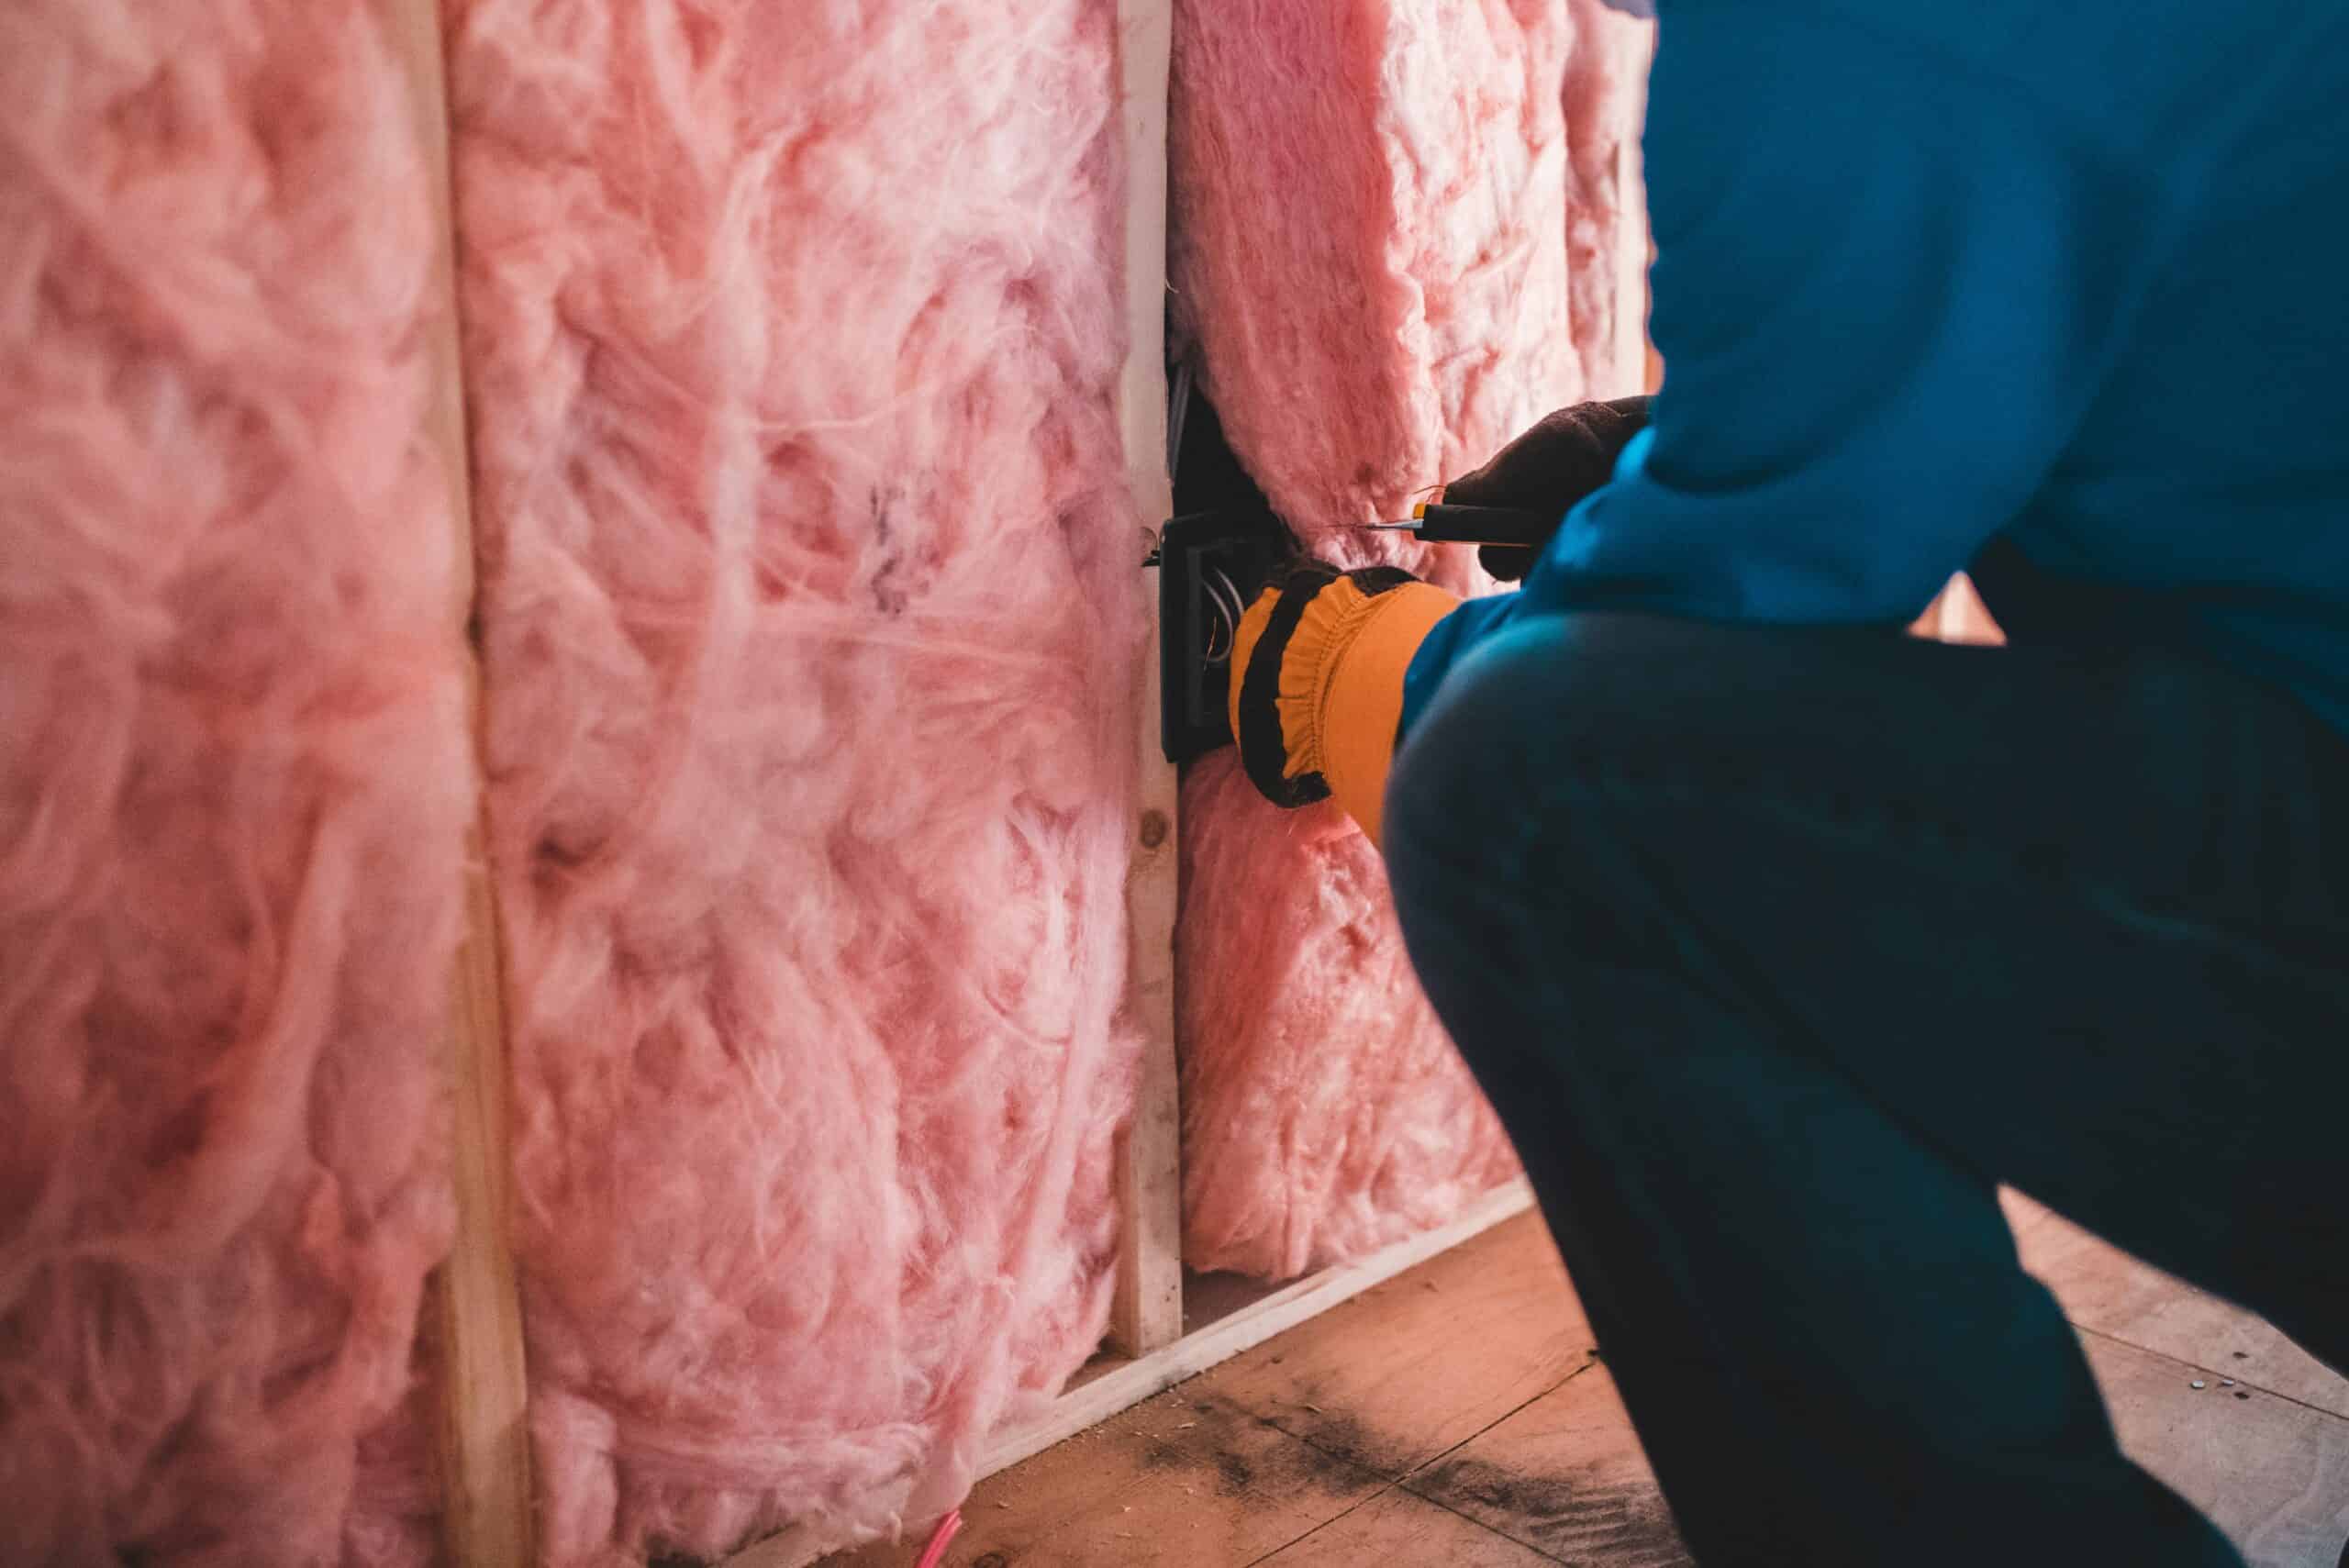
- Fiberglass or Mineral Wool Batts: This traditional batt insulation method involves building a wood stud wall inside the basement and fitting fiberglass or mineral wool batts between the studs. Fiberglass insulation is inexpensive and easy to DIY, making it a common way to insulate walls in many homes. Mineral wool (rock wool) batts are a similar insulation type that is more water-resistant. However, in basements this method requires careful moisture management (vapor barriers/retarders, etc.) to avoid trapping humidity. We’ll discuss the pros, cons, and proper technique for batt insulation in Method 2.
- Spray Foam Insulation: Spraying closed-cell polyurethane foam onto the walls is a high-performance option. Closed-cell spray foam insulation both insulates and air-seals the wall cavities, expanding to fill cracks and gaps. It has the highest R-value per inch of the common materials (around R-6 to R-7 per inch, so a 2-inch layer can give about R-12 to R-14). Spray foam is excellent for irregular surfaces and airtight seal requirements. However, it is also the most expensive and usually requires professional application (though DIY kits are available). We outline this method in Method 3. Open-cell spray foam is not recommended for basement walls, as it is too vapor-permeable and can absorb moisture.
- Other Insulation Options: In some cases, you might consider less common solutions. Injection foam can be used to fill hollow concrete block walls or closed wall cavities by drilling holes and injecting foam; this typically needs professional help and is used for retrofits. There are also new materials and panel systems (such as insulated foam panels with built-in studs or grooves for wiring) that can simplify installation. For example, some foam panels are designed with channels to insert furring strips or even come with metal or plastic studs integrated. These systems allow you to attach drywall without building a separate wall and provide continuous insulation, though they can be more expensive. If you have an old house with stone or rubble foundation walls (uneven surfaces), traditional insulation is tricky – in those cases, closed-cell spray foam is the best option because it will conform to the irregular surface and adhere well. Always choose materials that are appropriate for your wall type and climate.
As you plan, weigh the insulation options in terms of cost, difficulty, and performance. Many homeowners end up using a combination (for example, rigid foam against the concrete plus fiberglass batts in a stud wall) to get the benefits of each. In the sections below, we’ll detail how to execute each method.
Gather Tools and Materials
Having the right tools and supplies on hand will make the insulation process smoother. Here’s a quick checklist:
- Safety Gear: Work gloves, safety glasses, and a dust mask (especially when cutting fiberglass or spraying foam). If using spray foam, wear protective clothing and a respirator rated for organic vapors.
- Cutting Tools: A sharp utility knife is essential for cutting foam boards and batts to size. For thicker foam boards, a hand saw or insulation saw can help. You’ll also need a tape measure and straightedge for accurate cuts.
- Adhesives and Fasteners: If installing foam boards, get a foam-safe construction adhesive (one that won’t dissolve foam) and/or specialized fasteners for foam (such as masonry screws or plastic push-in anchors made for foam board). For furring strips or framing, have masonry nails or concrete screws to attach wood to concrete.
- Sealing Supplies: Cans of spray foam (expanding foam) for filling gaps around boards and at rim joists. High-quality caulk can also seal smaller cracks. Tape (housewrap tape or foil tape, depending on insulation type) to seal seams of foam boards or vapor barrier seams. Vapor barrier plastic (6-mil polyethylene sheeting) if your method calls for it – though as we’ll discuss, using plastic sheeting as a vapor barrier in basements must be done carefully.
- Framing Materials (if applicable): If building a stud wall: lumber (pressure-treated for the bottom plate), sill sealer foam strip for under bottom plate (optional extra moisture protection), nails or screws for framing, hammer or drill, and a level.
- Insulation Materials: Purchase your chosen insulation (foam panels, fiberglass rolls, etc.) in sufficient quantity. Measure the square feet of your basement walls to estimate how much you need, and add a bit extra for waste. Foam boards typically come in large sheets (often 4×8 ft). Fiberglass or mineral wool batts come in rolls or pre-cut pieces sized to fit standard stud spacing (e.g. 16 inches on center).
Finally, plan for how you’ll dispose of old materials if you’re removing any existing insulation (like those flimsy fiberglass batts or foam panels sometimes stapled to basement walls in older setups). Have trash bags or plan a dump run if needed. Once your plan is set and materials assembled, you’re ready to insulate!
Method 1: Interior Rigid Foam Board Insulation
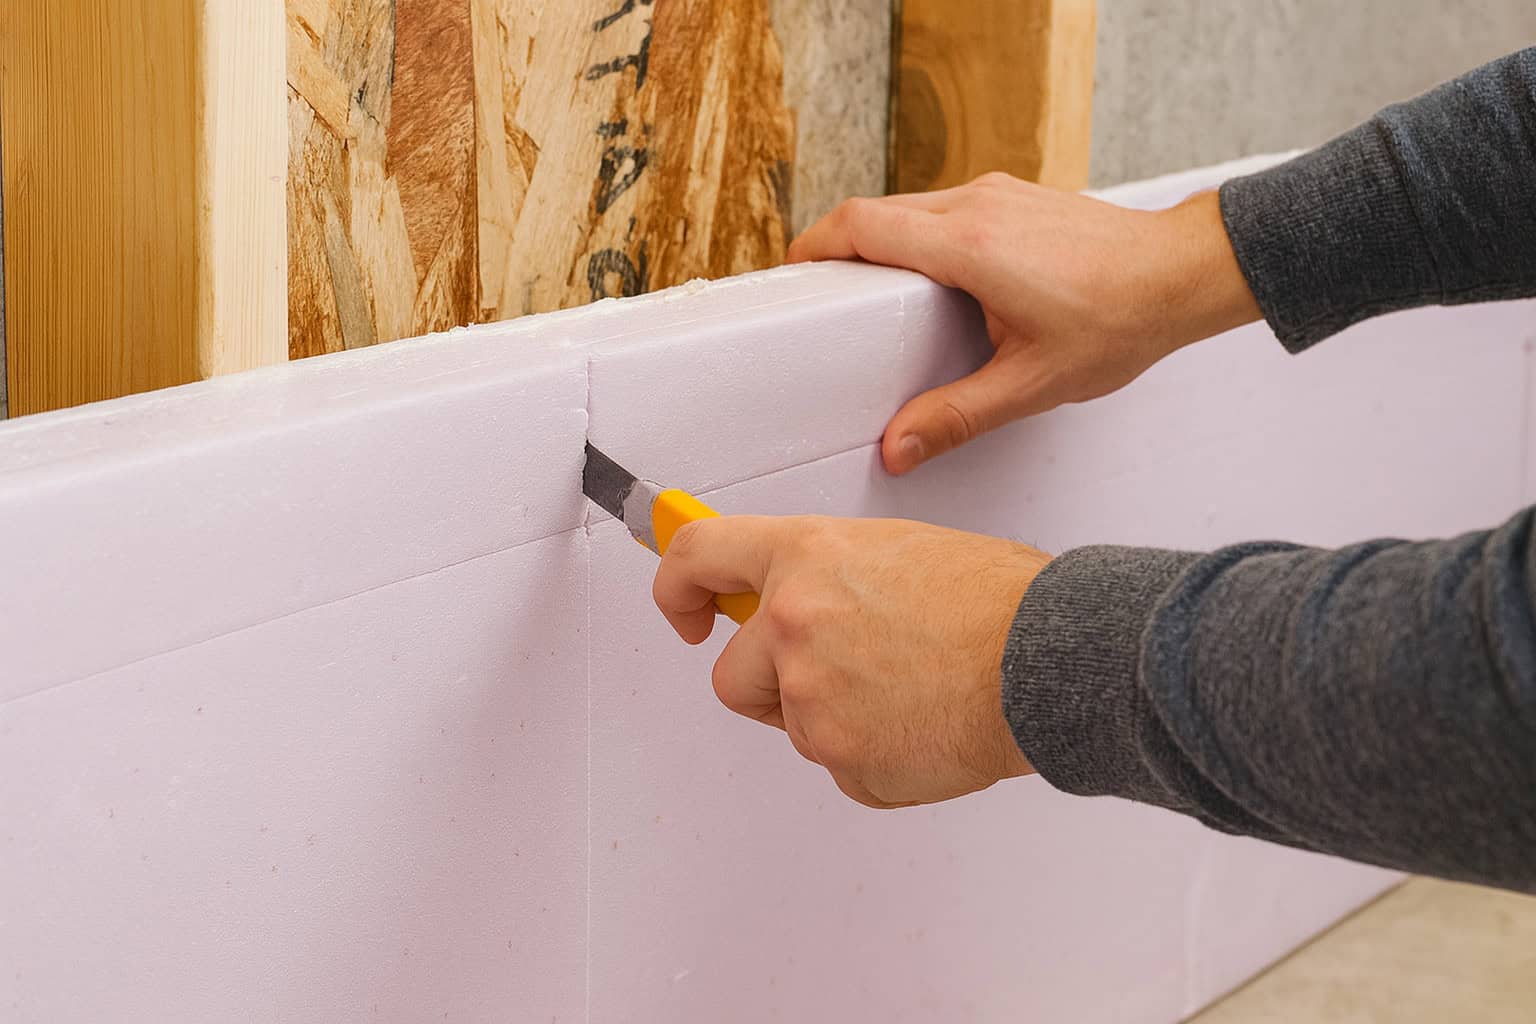
Overview: Rigid foam board insulation is one of the best methods for insulating concrete walls from the inside. In this method, you attach rigid foam panels directly to the basement foundation wall, creating a continuous layer of insulation and a built-in vapor barrier. Common foam boards for basements include extruded polystyrene (XPS, often pink or blue boards) or expanded polystyrene (EPS, the white beadboard style). Polyisocyanurate boards can also be used (often foil-faced), though they are more expensive. Foam board is impervious to moisture, so it won’t mold or rot, and it provides strong insulating value. Many contractors consider spray foam or rigid foam essential for basement insulation because they do “double duty” – they insulate and act as a moisture barrier at the same time. This method is great for a basement that will eventually be finished, but it can also be left unfinished for a while (you may just need to cover the foam for fire safety, which we’ll discuss).
For this method, foam panels usually come in large sheets (often 2 ft x 8 ft or 4 ft x 8 ft). You’ll cut them to fit the height of your wall using a utility knife or hand saw, and then adhere or fasten them to the concrete foundation wall. Apply a compatible construction adhesive in vertical strips or spread patterns on the back of the foam boards and press them against the wall. Many foam board manufacturers have recommended adhesives – look for one that says it’s safe for foam board (standard adhesives could dissolve foam). In addition to adhesive, you can use mechanical fasteners (special plastic cap nails or concrete screws with washers) to hold the panels tight. Work from one end of the wall to the other, fitting the foam boards in direct contact with the concrete. If your wall is taller than the board length, you’ll need to stack boards; stagger the seams so they are not all in one line. Tape all the seams between boards with appropriate plastic sheeting tape (for XPS/EPS, a housewrap tape or acrylic sheathing tape works well) to create an airtight seal across the entire surface. For any gaps or small openings, use canned spray foam to seal air leaks – this includes the gap along the floor, corners, and around any electrical wiring or pipe penetrations. The goal is a continuous insulated surface with no gaps.
Be sure to insulate the top of the wall as well – this is where the concrete foundation meets the wood framing of the house (the rim joist area). Cut pieces of foam board to fit over the top of the foundation wall and against the rim joists all along the perimeter. Adhering foam on this band (the top few inches of concrete and the rim joist above it) is critical, as a lot of heat loss and air leakage can occur at the rim joist. Sealing this area will stop warm air from escaping at the edges and block cold air drafts at the junction of the wall and floor framing.
Once all foam panels are installed and sealed, you have a continuous layer of insulation over the interior of the basement wall. At this point, the basement wall insulation is effectively in place, and you could leave it as-is if the basement will remain unfinished (just remember that foam must be covered with a fire-resistant layer if people are using the space, more on that below). However, most homeowners using this method will proceed to finish the walls either immediately or in the future. There are two ways to finish over the foam:
- Attach Furring Strips: Some rigid foam board insulation products are made with slots or surfaces to accommodate furring strips. You can fasten vertical wood strips (1×3 or 2×2 lumber) on top of the foam, anchoring them through the foam and into the concrete with concrete screws or nails. Position strips 16 inches on center so they line up with drywall seams. This approach allows you to then hang drywall on the furring strips without building a full wall. It keeps the profile thin – useful in smaller basements where you don’t want to lose much space. However, this method is only feasible if you do not need to run electrical wiring or plumbing in that wall, since there’s essentially no cavity space. It also does not add any extra R-value beyond the foam itself (aside from a tiny bit from the air and drywall). If you use furring strips, ensure your foam thickness alone meets the required R-value, because you won’t be adding insulation between studs. Also, make sure the concrete wall is fairly even; furring strips won’t easily compensate for a wavy wall. Attach the strips using masonry anchors or nails at regular intervals. This can be a simple way to finish an insulated wall for a living space if no utilities need to go in the wall.
- Build a 2×4 Framed Wall: The more common approach is to erect a traditional framed wall in front of the foam. This involves constructing a wood stud wall (usually with 2×4 studs) slightly inside of the foam-covered wall. Since the foam is already acting as a continuous insulation layer and moisture barrier, you can press the stud wall right up against the foam or leave a tiny gap (1/2″ or so) if preferred. Anchor the bottom pressure-treated plate to the concrete floor (using concrete nails or screws), and secure the top plate to the joists or sill above. The studs can be spaced 16″ on center. This assembly gives you a normal wall cavity where you can run electrical wires, outlets, and plumbing as needed – something that furring strips alone wouldn’t allow. Another big advantage is you can now add fiberglass batts or mineral wool batts between the studs for additional insulation, on top of the foam layer. For example, a 3½-inch thick R-11 batt added in the stud wall will increase the overall R-value of your basement wall by roughly 11 more, significantly boosting energy performance. Many builders consider the foam + stud + batt combination to be the best type of insulation approach for basements, because the foam keeps moisture off the batts and the batts add affordable R-value. When framing over foam, remember to use pressure-treated lumber for any wood that directly contacts concrete (the bottom plate), as required by code. Also, put a strip of foam sill sealer or similar between the bottom plate and floor for extra protection against slab moisture. Once the wall is framed and insulated, you can drywall it just like any interior wall.
No matter which finishing route you take, one best practice to note: Do not install an additional plastic vapor barrier on the interior side of a foam-insulated wall. The foam boards themselves act as a vapor retarder, and adding a layer of polyethylene sheeting on the inside could trap moisture between the foam and the poly, causing moisture issues. In fact, experts advise never to sandwich a basement wall with double vapor barriers, as polyethylene can trap moisture, leading to mold or rot. One vapor retarder in the assembly is plenty (and the foam is it in this case).
Finally, remember the thermal barrier requirement: Building codes mandate that foam plastic insulation on interior walls be covered with a fire-resistant layer (usually ½” drywall) when the space is occupied. Foam is combustible and gives off toxic smoke in a fire. If you are leaving the basement unfinished, you might use a temporary solution like code-approved ignition barrier paint or drywall scraps to cover the foam. Some specialized foam boards (e.g. Dow Thermax) are rated to be left exposed because they have a foil facing that meets fire codes – check the product specs if you go that route. Generally, it’s simplest to plan on installing drywall over the foam (either on the furring strips or on the framed wall) as the final step for a safe, code-compliant installation.
Summary of Method 1 (Rigid Foam Board): Glue and/or mechanically attach rigid foam panels to the concrete walls, tape the seams, and spray foam the edges for an airtight seal. This provides continuous insulation and a vapor barrier against the wall. Then either finish with furring strips and drywall, or build a separate stud wall in front for wiring and additional batt insulation. This method yields a high R-value, continuous insulation with no thermal breaks, and excellent moisture control for your basement wall insulation project.
Method 2: Wood Stud Wall with Fiberglass or Mineral Wool Batts
Overview: Insulating with fiberglass or mineral wool batts in a stud wall is a more traditional method and a popular choice for above-grade walls. It’s appealing because the materials are widely available and inexpensive, and many DIYers are familiar with installing fiberglass batt insulation. You can certainly use this method in a basement, but it must be done carefully to avoid moisture problems. The basic idea is to build a wood stud wall a few inches in front of the concrete, then place insulation batts between the studs. The challenge is that you don’t want the fluffy insulation to get damp from the cool, damp concrete wall. This method can be suitable for an unfinished basement that you’re preparing to finish, but it’s important to include proper vapor retarders and not allow the batts to touch wet concrete directly. Many builders actually combine this method with Method 1 (using a foam board layer against the wall) for best results, but we’ll first describe the batt-alone approach and then note how to improve it.
Fiberglass batts have long been a common way to insulate walls because they’re affordable and easy to install – truly a popular choice among DIYers. Mineral wool (rock wool) batts are an alternative that are slightly more expensive but more moisture resistant and mold-resistant than fiberglass. In a basement environment, if choosing between the two, mineral wool is the better option because it tolerates dampness better. Mineral wool batts also are unfriendly to pests and can provide a bit of sound insulation too. So keep that in mind: wherever this section mentions fiberglass, you could use mineral wool instead for a more robust solution against moisture issues.
Here are the general steps for insulating with batts and a stud wall:
- Frame the Basement Wall: Construct a 2×4 (or 2×3) stud wall inside your concrete wall. This wall can be built in place or pre-assembled and tilted up. Typically, you place it about 1 inch away from the concrete wall – just enough to avoid direct contact and leave a slight air gap so the wood isn’t touching the damp concrete. (In some cases, people attach studs directly to the wall, but having a small gap is better for moisture safety and squaring the wall.) Ensure the bottom plate is pressure-treated since it’s on the concrete floor. Anchor the bottom plate to the floor with concrete fasteners and nail or screw the top plate to the joists or framing at the ceiling. Space studs 16″ on center. This framed wall will serve as the support for insulation and drywall. It also creates a cavity for running electrical wiring or pipes as needed, which is handy if you plan to finish the space.
- Install a Vapor Barrier (if using one): Traditionally, when builders insulated basements with fiberglass, they would first put up a plastic sheeting (6-mil polyethylene) vapor barrier on the concrete wall before installing the batts. The idea was to create a moisture barrier between the damp concrete and the insulation. You might hear this referred to as “poly on the wall.” One method is to roll out sheets of plastic across the concrete wall, from the top (at the mudsill) to the bottom floor, and tack it in place. The stud wall is then built against the plastic. This old-fashioned approach was intended to keep the fiberglass dry.
However, this method has significant drawbacks: The plastic is easily torn or punctured during construction, compromising its effectiveness. It also provides no insulation value itself (plastic sheeting’s R-value is near zero). Moreover, if any moisture does manage to get behind the plastic (say through a tear or from the floor), the plastic will trap moisture against the wall, since it won’t let it dry out – leading to a potential mold situation. Modern building science generally discourages the use of interior polyethylene in basements for these reasons. A better approach is to use a vapor retarder on the warm side of the insulation (more on that in a moment) and/or include a smarter strategy like foam board. In summary, you can put up a poly sheet on the concrete as a cautious measure if you understand the risks, but many experts would skip it or use a more breathable housewrap instead to allow some drying. - Place Insulation Batts Between Studs: Fit your fiberglass or mineral wool batts into the stud bays. Use the correct width batts (typically 15″ for 16″ OC framing). Fiberglass insulation should fill the cavity without significant gaps or compression. Cut pieces to fit around any obstacles (cutting a slit for an electrical wire to pass through a batt, for instance, so the batt isn’t pushed out). The insulation should be in contact with the wall or the vapor barrier behind it – do not leave a big air gap between the batt and the wall, because warm indoor air could sneak behind the batt and condense on the cold concrete. That said, do not let the fiberglass touch the bare concrete directly either, or it may get damp by capillary action. If you didn’t use a plastic barrier on the wall, at least ensure the paper backing of faced batts (or kraft paper) is facing inward and not against the concrete. Unfaced batts can also be used and later covered with a separate vapor retarder. One tip: mineral wool batts are a bit more rigid and can friction-fit nicely, whereas fiberglass is floppier and may need support to stay in place (you can use insulation support wires or staple straps across the face).
- Install an Interior Vapor Retarder: Since you likely didn’t use an impermeable plastic on the wall (or even if you did), you will need some form of vapor control on the interior side of the insulated wall. This is often required by local building codes to prevent moisture from the humid basement air from infiltrating the insulation. You have a few options:
- Faced Batts: If you used paper-faced (kraft-faced) fiberglass batts, the kraft paper acts as a vapor retarder (not a full vapor barrier, but a class II vapor retarder). In many climates, this is sufficient. You would place the batts with the paper side facing the interior of the room (warm side in winter), and you typically do not add any additional plastic sheeting over that.
- 6-mil Polyethylene: This is the classic vapor barrier approach – stapling continuous plastic sheets across the inner face of the stud wall, covering the insulation before installing drywall. While this will stop moisture vapor from the room from getting into the wall, it comes with the danger of trapping moisture that might come from the other side (the concrete). If you already have poly behind the insulation, adding poly in front creates the dreaded double vapor barrier scenario – moisture can get trapped between the two layers of plastic with no way to escape, a perfect recipe for mold growth. Avoid two vapor barriers. If you use poly on the inside, you definitely should not have put one behind the studs.Vapor Retarder Paint or Smart Membranes: A more modern solution is to skip interior poly sheeting and instead paint the drywall with a special vapor retarder paint, or use a smart vapor retarder membrane (e.g. CertainTeed MemBrain) that changes permeability. These allow the wall to breathe a bit more and are safer in terms of not trapping moisture long-term.
Whichever interior vapor retarder you choose, ensure it’s continuous: overlap seams, tape them, and seal around edges. If using poly, for instance, run it from floor to ceiling, overlapping and taping seams, and seal it to the top and bottom plates. Keep in mind that some building codes in warmer climates actually forbid interior poly because it can trap moisture coming from outside in air-conditioned houses. Check your local guidelines. - Finish with Drywall: After insulating and adding any interior vapor retarder, you can close up the wall with drywall. Use moisture-resistant drywall for basements if desired. When installing the drywall, it’s a best practice to keep the bottom edge about ½” to 1″ off the floor (don’t let it touch the concrete slab). This way if there’s a minor water spill or moisture on the floor, it won’t immediately soak into the drywall. The gap will be covered by baseboard trim later. Now your wall is finished and insulated.
Important Precautions for Method 2: This method can be risky in cold climates if not done right. Why? Because warm air from the basement can carry moisture into the insulation, reach the cold concrete or plastic, and condense into water. Also, concrete constantly releases a bit of moisture. A purely fiberglass-insulated wall doesn’t stop vapor; it only slows it. This is why many experts say a basement wall should never rely on fiberglass alone. Building science expert Martin Holladay notes that it’s inadvisable to insulate a basement wall with fluffy insulation like fiberglass unless the wall has first been insulated with a layer of continuous rigid foam or spray foam. The continuous foam (as described in Method 1) is what keeps the wall warm and dry. So, one way to improve this method is to combine it with Method 1: put even a 1 inch layer of rigid foam against the concrete first, then frame and add batts. That hybrid approach gives you the best of both worlds – the foam acts as a thermal break and vapor barrier on the wall, so the fiberglass stays warm and dry behind the foam. If foam board is too costly for the entire wall, consider at least using strips of foam or a product like foam channel at the contact points of the studs against the wall, to avoid wood directly touching the concrete (which can wick moisture). Never leave fiberglass in direct contact with concrete, and avoid any scenario where moisture can get trapped between two vapor barriers (trap moisture = bad).
Another improvement is to use mineral wool batts instead of fiberglass. As mentioned, mineral wool (Roxul brand, etc.) can handle getting a bit wet without deteriorating and it doesn’t support mold growth the way fiberglass can. If any moisture does sneak in, mineral wool will dry out better and not slump or lose insulation value as quickly. It’s a small upgrade in cost that adds a bit of safety for basements.
Also, always inspect and seal air leaks in the wall before insulating. Check along the rim joist, sill plate, and any penetrations. You can use spray foam or caulk to seal gaps where cold air might enter (like around pipes, vents, or cables going outside). If you seal these up, your insulation will perform much better and you avoid cold drafts bypassing your insulation.
Pros and Cons: The main advantage of the fiberglass batt method is cost – fiberglass is one of the cheapest insulation materials, and you might already have the skills to install it. It’s also easier to remove or change later if needed (as opposed to glued foam or hardened spray foam). A stud wall provides a nice structure for finished walls and running utilities. However, the downsides are the moisture risk and the fact that fiberglass does not air-seal – meaning cold air can still sneak through cracks, which can reduce its effectiveness. In a basement, fiberglass alone is generally considered the least favorable insulation method unless combined with other measures. It’s worth noting that some local building codes might require a minimum continuous insulation (foam) even if you use batts, precisely due to these moisture considerations. Always check code or consult a reliable source if unsure.
In summary, Method 2 can work if you keep the insulation dry and use proper vapor retarder strategy. If you ever notice the basement wall or insulation getting damp or musty, you may need to rethink the assembly (for example, adding interior foam or improving drainage). When done carefully, a batt insulation approach can make your basement warmer and is a definite improvement over uninsulated basements, but it’s often not the best method unless augmented with some rigid foam. Think of fiberglass as part of a system – and strongly consider combining it with Method 1 for a safer, higher-performance wall.
Method 3: Closed-Cell Spray Foam Insulation
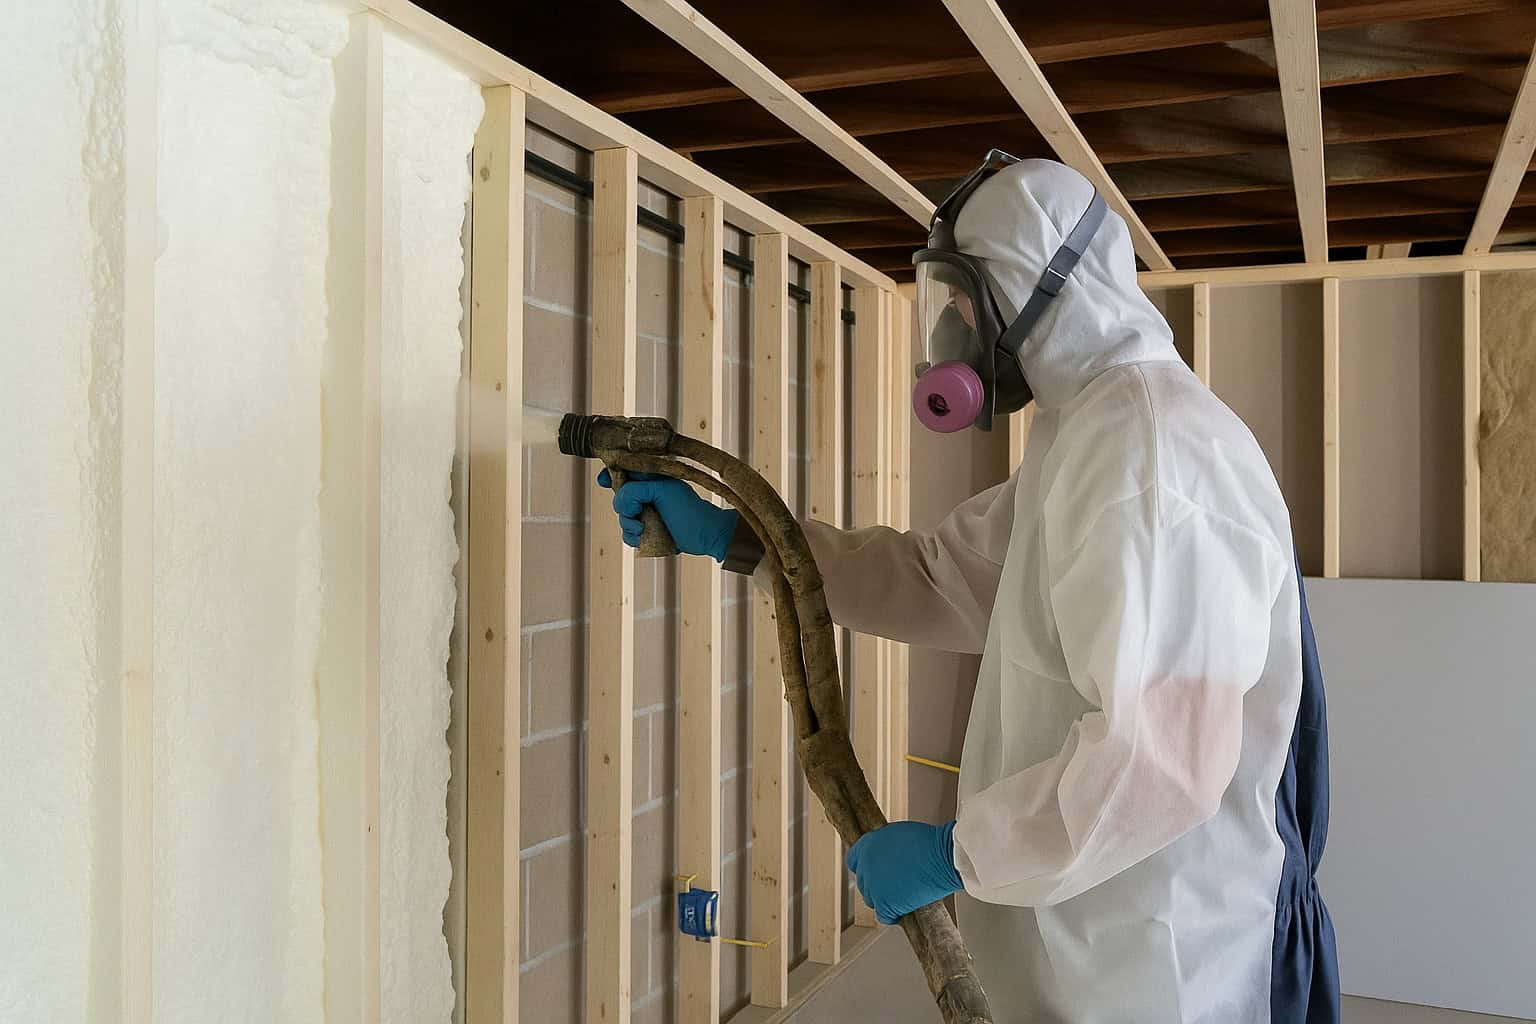
Overview: Using spray foam insulation is a fast and effective (though more expensive) way to insulate a basement. Closed-cell spray foam is applied as a liquid that expands into a thick foam, adhering to the walls and completely sealing all the nooks, crannies, and gaps. The result is both insulation and an airtight seal in one. Closed-cell foam is rigid and moisture-resistant; at about 2 inches thick it also serves as a vapor barrier. It boasts a very high R-value (roughly 6 to 7 per inch, one of the highest R-values available), so you can achieve a code-required R-value with relatively little thickness. Open-cell spray foam, by contrast, remains semi-flexible and is not suitable for basement walls – it is too vapor-permeable and can absorb water. So if we talk about spray foam for basements, it means closed-cell only.
Spray foam is often installed by professional insulation contractors. They have truck-mounted rigs that can spray large areas quickly. For a DIYer, there are two-component spray foam kits (with tanks of chemicals you mix at the nozzle) available at hardware stores. These kits can be used to spray smaller areas like rim joists or a single wall, but for large jobs (like an entire basement), hiring a contractor may be more cost-effective and ensure quality coverage. For instance, a typical DIY spray foam kit might cover ~200 board feet (i.e. 200 sq ft at 1″ thick) and costs a few hundred dollars; calculating how many kits you’d need for a whole basement often reveals the cost will exceed a pro’s price. That said, for smaller sections or if you want to avoid having workers in your home, the DIY route is an option – just follow all safety guidelines strictly.
Preparation: If you plan to finish the basement with framing, the recommended approach is to build your stud walls before spraying the foam, leaving a gap between the back of the studs and the concrete wall. This gap will be completely filled with spray foam, locking the new wall to the concrete in a sense. Why frame first? Because once the foam is sprayed, it’s much harder to install studs flush to the wall (the foam would be in the way). By framing first with a gap, you ensure that the studs end up embedded in the foam and you have a flat face to attach drywall after. Typically, you frame the wall 1.5″ to 2″ away from the concrete. The spray foam will expand to fill that gap behind the studs. As with Method 2, use pressure-treated wood on the bottom plate and ensure the wall is plumb and anchored properly, since you won’t be able to adjust it after foaming.
If you are not going to frame the walls at all (say you just want to spray directly on the foundation and leave it as is), you can do that too. Many unfinished basements have closed-cell foam sprayed right on the concrete and left exposed (again, it must be covered with a fire-rated coating or barrier for safety). The foam itself is rigid enough to stay put without any studs or fasteners.
Before spraying, cover any areas you don’t want foam on (for example, cover windows, electrical panels, the furnace, etc.) with plastic sheeting. Spray foam is incredibly sticky and difficult to remove, so mask off thoroughly. Also, if you have any electrical wiring running along the wall or through joists that you might need access to later, consider that spray foam will encase it. Sometimes it’s better to reroute wires or run new electrical lines after foam using surface-mounted conduit, rather than burying junction boxes in foam (which is against code). Plan ahead for things like outlets: if you want outlets on those walls, have the wiring and boxes in place within a stud wall before spraying, or you’ll have to carve channels in the foam later.
Application: Follow the product instructions closely. For DIY kits, you’ll wear protective gear (coveralls, gloves, eye protection, and a proper respirator). Shake the tanks as directed, connect the hoses and nozzle, and test spray on a small surface first. The foam is applied in a sweeping motion, usually building up to the desired thickness in layers. Do not spray too thick in one pass – closed-cell foam generates heat as it cures, so manufacturers often recommend building up in ~1-inch layers to prevent overheating or poor curing. The foam will expand and harden within minutes. Aim for an even coverage over the entire wall surface, including into corners and crevices. A typical desired thickness for basement walls might be 2 to 3 inches of closed-cell foam. At 3 inches, for example, you’d get roughly R-19, plus a very good air seal. Remember to spray up between the floor joists at the rim joist area too (we’ll talk more about rim joists in the next section, but don’t miss them during your foam application!). Spraying the rim joists and sill plate area will seal all those little gaps where air leaks are common.
One advantage of spray foam is that it automatically fills and seals around pipes, wires, and any irregular shapes on the wall, performing as both insulation and air sealer. You don’t need separate caulking for those small gaps – the foam does it for you. Just be sure to check afterwards for any missed spots. It’s a good idea to inspect the cured foam with a strong light, looking for thin areas or voids. If you find any, you can touch them up with a can of spray foam or a second pass from your kit (if you still have material left). It’s important that there are no uninsulated patches, because even a small cold spot on the wall could become a condensation point (imagine a small circle of bare concrete amid the foam – that could get wet). So take the time to ensure full coverage. If hiring a contractor, make sure they did a complete job with no gaps or shrinkage cracks that expose the concrete.
After application, let the foam cure as directed (usually it sets quickly, but you might ventilate the area for a day to clear out any lingering chemical odor before spending time down there without a respirator). The cured foam is firm and can be trimmed with a knife or saw if it expanded beyond where you wanted it. For instance, if you framed first and some foam is protruding past the stud faces, shave it flush so drywall will sit flat.
Covering the Foam: Just like foam board, spray foam must be covered with a thermal barrier when the basement is a living space. This means installing ½” drywall over the stud wall (which is already in place if you framed beforehand). If you sprayed directly on the walls with no studs, you’ll need to find a way to cover it – typically that means furring strips and drywall, or using a special fire-rated paint (intumescent coating) approved for this purpose. The standard solution is drywall, as it’s cheapest and most reliable. According to building codes, any interior foam needs a 15-minute fire-rated covering (equivalent to drywall) to slow fire spread. Do not skip this for an occupied basement room.
Special Cases: As noted, stone or brick foundation walls that are uneven are almost impossible to insulate with rigid foam or fiberglass – spray foam is really the best option in those cases. It will conform to all the bumps and seal up the myriad air gaps in old foundations. If you have a stone foundation, spray foam on the interior will both insulate and help bond loose mortar together (an added perk). Just be aware that stone foundations must be able to dry out, so you wouldn’t want to put a non-breathable coating on the exterior of a stone wall at the same time – let the exterior breathe if the interior is sealed.
Pros and Cons: The big pro of closed-cell spray foam is you get superior insulation performance and air sealing all in one step. It creates a warm air barrier and airtight seal that vastly reduces heat loss and drafts. You also don’t have to worry about vapor barrier layers, because the foam itself is a vapor retarder when installed at sufficient thickness. Another advantage is that it adds some structural strength to walls and it can go around curved or irregular areas easily. The cons are primarily cost and safety. Spray foam is the priciest option per square foot. The chemicals are hazardous to work with (you need proper PPE and ventilation during installation). If applied incorrectly (too thick too fast), the foam can overheat or not cure right. And once it’s in place, it’s messier to modify – e.g. if you later want to run a new wire, you’ll be digging a channel through hard foam. For a DIYer, using a kit in a large area can be challenging; many end up calling a pro. Speaking of which, professional help might be worth considering for this method unless you’re confident. Contractors will ensure the right mix and thorough coverage, and you may find their service areas include free estimates so you can gauge cost vs DIY.
Summary of Method 3 (Spray Foam): Frame the wall first (if finishing), then spray closed-cell foam to the desired thickness on all exterior walls (and rim joists). The foam provides insulation and an air-tight, moisture-resistant barrier in one. Aim for even coverage with no gaps. After curing, trim as needed and finish with drywall to meet fire codes. This method yields an extremely well-insulated basement with minimal thermal bridging and excellent energy efficiency performance. While it has a higher upfront cost, it often results in lower energy consumption over time due to its effectiveness. Many homeowners do a hybrid – for example, DIY rigid foam panels for the easy parts and spray foam for hard-to-reach areas like the rim joists, or they hire pros to spray the whole basement if budget permits.
Insulating Rim Joists and Basement Ceilings
No basement insulation job is complete without addressing the rim joists (also called band joists) at the top of the foundation. The rim joist area is where the floor structure of the house sits on the foundation walls – these are the wood joist bays around the perimeter of the house. This area is notoriously leaky and poorly insulated in many homes. In fact, insulating rim joists is now required by most modern building codes (for example, the 2018 IRC prescribes about R-13 to R-20 in rim joists, depending on climate). If you neglect the rim joists, you’ll continue to get cold drafts and heat loss up at the edges of the basement ceiling even if the walls are insulated.
How to Insulate Rim Joists: The two main options are using rigid foam pieces or spray foam. Fiberglass insulation is not recommended for rim joists. In the past, people would shove fiberglass batts into these joist bays, but because fiberglass is air-permeable, warm interior air can still reach the cold rim joist and cause condensation or even frost. The wood can get damp and rot over time when insulated only with fiberglass. Plus, fiberglass doesn’t stop the air leakage at all – you’ll still feel drafts. So, the best approach is to use foam which both insulates and seals.
- Rigid Foam Method: Cut rectangles of rigid foam board to fit snugly into each rim joist cavity (measure the width and height of each bay; they’re often about 14.5″ by 9″ or so, but it varies). It’s usually easiest to cut them a tad smaller than the opening (maybe 1/4″ less in each dimension) and then use spray foam around the edges to seal. Place the foam piece against the rim joist (the outer band) – this will also cover the top of the concrete foundation wall at that spot. Use a couple of cap nails or staples to hold it in place if needed. Then, take your can of spray foam and fill the gap around the perimeter of the foam piece, as well as any gaps around pipes or wires in that bay. When the spray foam cures, it not only seals air leaks but also glues the foam block in place. The result is a nice insulated plug for each joist bay. Aim for at least 2 inches of foam board thickness if possible (R-10 or higher). You can even do multiple layers of foam board if one layer isn’t thick enough, or add a batt of mineral wool in front of the foam for extra R-value after air-sealing the foam in place. Just do not put fiberglass or mineral wool in a rim joist by itself without at least 2″ of foam against the rim – that’s the guideline to avoid condensation.
- Spray Foam Method: If you have a spray foam kit (or a contractor on hand), spraying the rim joists is quick and very effective. Closed-cell spray foam is preferred (though for rim joists in milder climates, some codes allow open-cell; in cold climates stick with closed-cell). Simply spray each rim joist area with a layer of foam (2+ inches ideally) making sure to cover the wood rim joist, the top of the concrete wall, and the corners where the joists meet the rim. The foam will seal every little crack – commonly there’s a gap between the foundation and the sill plate, and between the sill and rim joist, which foam will fill. This method is great if you’re already spraying the walls; you just continue up into the rim bays. If hiring out, many contractors include rim joists when they spray basement walls. The result is an airtight and well-insulated rim.
Both foam board and spray foam will achieve the goal of insulating the rim joist while also blocking air infiltration. Fiberglass batts alone are disastrous here in a cold climate – they often lead to frost and rot as mentioned. If your rim joists currently have fiberglass stuffed in them, it’s a good idea to pull it out and insulate with one of the foam methods described. You may find the wood behind was damp; foam will solve that by keeping it warm and dry.
After insulating, the rim joist areas should also be covered with a thermal barrier (e.g. drywall) if your basement is a finished living space or if code requires it. Often, the rim joist ends up hidden behind drywall when the basement is finished. If the basement is unfinished, you could cut and push pieces of drywall up into each joist bay to cover foam, or use an ignition barrier spray paint if allowed. Check local code requirements for exposed foam in rim joists.
Basement Ceiling Insulation: What about the ceiling of the basement (i.e., the underside of the first floor)? Whether you should insulate here depends on how you intend to use the basement:
- If you will use the basement as conditioned space (heated in winter along with the rest of the house), then you generally do not insulate the basement ceiling. You want the heat from the basement to rise and warm the first floor, and you don’t want to inadvertently create a cold floor above by cutting the basement off thermally. Most finished basements leave the ceiling uninsulated, or they might add insulation only for soundproofing (in which case, sound-rated mineral wool is used, not so much for thermal reasons).
- If the basement will not be conditioned (say it’s just storage or you only heat it minimally), and you want to keep the floors above warmer, then insulating the basement ceiling can help. Essentially, you’re treating the basement like a crawl space or unconditioned space in that scenario. Bear in mind, if you do this, the basement itself will be much colder, which could be an issue for any plumbing down there. But for some homes in warmer regions or certain designs, this might be the case.
To insulate a basement ceiling, the typical material is fiberglass batts placed between the floor joists. You can use unfaced batts and hold them up with wire supports, or use paper-faced batts and staple the paper flanges to the joists. The key is to get the insulation in full direct contact with the subfloor above – you don’t want gaps sagging down, because any air gap above the insulation will allow warm air to circulate and defeat the purpose. So push the batts up against the subfloor. If the joist bays are already enclosed or you want a higher R-value, you could consider blown-in insulation, but that’s less common for DIY. Normally, a ceiling might get R-19 to R-30 batts, depending on joist depth.
One thing to avoid: Do not install a vapor barrier on the basement ceiling in cold climates. If you were to put plastic under the floor, you could trap moisture in the joist bays from above. Generally, you rely on the floor above as the vapor retarder (if it even needs one – in most cases, it’s not needed because the basement below is somewhat controlled environment). So just use unfaced or paper-faced batts (with paper facing up toward the heated space).
After insulating between joists, you might choose to finish the ceiling with drywall for fire protection and appearance (especially if you have living space above, you don’t want a fire from the basement quickly reaching the first floor structure – building codes often require a fire barrier on the ceiling if the basement is unsprinklered). If you leave it open, remember that exposed fiberglass batts can sag over time and aren’t pretty, but they are not a fire hazard in themselves.
Air Sealing and utilities: If you insulate the ceiling, also take the time to seal any penetrations between the basement and first floor. Things like holes around pipes, gaps around chimneys, or wiring holes through the top of the basement wall should be sealed with caulk or fire-rated spray foam. This stops air leaks and also slows fire spread. For example, where an electrical wire goes up through the subfloor or a plumbing pipe, use some sealant around it. This not only saves energy by preventing warm air from escaping upstairs or cold air coming up, it also can improve air quality (keeping basement air, with any dust or odors, separate from living areas).
Pros and Cons of Ceiling Insulation: Insulating the ceiling will keep the upstairs warmer at the expense of the basement being colder. It can be a good strategy if the basement is truly unused and you don’t want to spend money heating it – essentially turning it into a buffer zone. However, most energy experts will tell you that if you have ductwork, water heaters, or plumbing in the basement, you’re usually better off insulating the walls and including the basement in the conditioned envelope of the house. Otherwise, those pipes and ducts are in a cold environment and lose energy or risk freezing. One compromise is to insulate the walls (to moderate the basement temperature) and lightly insulate the ceiling for sound reduction. If you do insulate the ceiling, make sure to also insulate any heating ducts and hot water pipes in the basement so they don’t lose heat to the now-cold basement.
In summary, focus on the rim joists as a must-do part of basement insulation (using rigid or spray foam for an airtight seal). For the basement ceiling, insulate it only if you’re purposefully keeping the basement unheated; otherwise, you can leave it uninsulated to allow heat to rise and the basement to stay warmer from the house’s heat.
Additional Tips and Best Practices
- Fire Safety (Thermal Barriers): As mentioned, any foam (rigid or spray) on interior basement walls must be covered with a fire-resistant barrier like drywall. Don’t leave foam exposed in a habitable area thinking it’s okay “since it’s only the basement.” Check your local code, but generally ½” drywall or a special intumescent paint is required. It’s an easy step that could be life-saving in a fire.
- Pressure-Treated Wood and Moisture Protection: Always use pressure-treated lumber for any framing that contacts concrete (e.g. bottom wall plates). Concrete can transmit moisture, and untreated wood sitting on a slab will eventually rot. As an extra measure, put a sill gasket or strip of foam under the bottom plate as a moisture barrier. Also consider raising any wood shelving or platforms off the basement floor a bit (even an inch) if your floor is occasionally damp or prone to minor water issues.
- Don’t Block Access or Ventilation: When insulating, be careful not to bury junction boxes or cover up things that need inspection (like water shutoff valves, sewer cleanouts, etc.). Plan access panels or leave those areas exposed (and insulated in a removable way, like with a foam board plug you can take out). If your furnace or boiler is in the basement and uses basement air for combustion, be mindful that seriously tightening up and insulating the basement can starve it of air – you might need to provide ventilation or convert to direct-vent appliances.
- Combining Methods: There’s no rule you can only use one method. Many successful basement projects use a hybrid approach. For example, you might do rigid foam on walls and spray foam the rim joists (a very common combo). Or use rigid foam on the walls, plus a stud wall with batts for extra insulation (foam takes care of moisture, batts boost R-value). Another idea: use rigid foam for most of the wall, and in any tricky spots (around windows, obstructions, tight corners) use canned spray foam or pieces of mineral wool to fill gaps. The goal is continuous coverage and no glaring weak points.
- Watch for Condensation Clues: After insulating, especially if using batts, keep an eye (and nose) out for any signs of trouble during the first winter. If you smell a musty odor or see damp patches on new drywall, investigate immediately. It could indicate a point where moisture is getting trapped. Often, issues arise from things like a forgotten gap in insulation, a missed air leak, or an unexpected water intrusion. Early action can save you having to rip out lots of work later.
- Use Reliable Information: If you’re ever unsure about a detail (for example, “Do I need a vapor retarder in my specific climate?” or “What R-value should I aim for in my climate zone?”), refer to reliable sources like the U.S. Department of Energy’s guides, Building Science Corporation publications, or ENERGY STAR guidelines. The DOE’s Building America program has detailed documents on basement insulation best practices, and their studies show that insulating basement walls can save a significant portion of heating energy. When in doubt, ask specific questions to professionals or inspectors – your local building department can be surprisingly helpful if you call with a code question. It’s better to build it right the first time.
- Professional Help: While this article empowers you to do it yourself, know your limits. If you have extensive water issues, a very old home with crumbling walls, or you need the job done quickly and correctly, consider getting quotes from insulation contractors. They can advise on the best method for your scenario and ensure everything is up to code. Many companies will travel to provide services (check their service areas and reviews). Even if you ultimately DIY, consulting a pro for an assessment can give you peace of mind. And certainly, for something like large-scale spray foam or working with hazardous materials (like if you suspect asbestos in old insulation), professional help is warranted.
By following these guidelines and best practices, you’ll be well on your way to a warmer, dryer, and more efficient basement. Insulating a basement is a project that goes a long way toward improving your home’s comfort. Once done, you’ll likely notice the floors upstairs are less chilly, and the basement itself will be far more welcoming. You can turn that previously cold dungeon into a useful extension of your home – be it a storage area that doesn’t freeze, or fully realized living space like a rec room or home office. Plus, you’ll reap the benefit of energy savings for as long as you own your home. In conclusion, tackling a DIY basement insulation project is absolutely worth it for the many benefits it provides. With careful attention to moisture control, the right materials, and adherence to code, you can insulate your basement walls, rim joists, and more with confidence. Enjoy your more comfortable and energy-efficient basement!


Pingback: DIY Basement Finishing: Step-by-Step Guide for Homeowners
Pingback: Best Paint for Concrete Basement Walls (Waterproofing Guide)
Pingback: Best Dehumidifier for Allergies (2025) | Improve Indoor Air Quality & Reduce Mold
Pingback: Do You Need an Air Gap Between Insulation and Plasterboard?